Eclipse 3.5 - new features in the Platform and Equinox
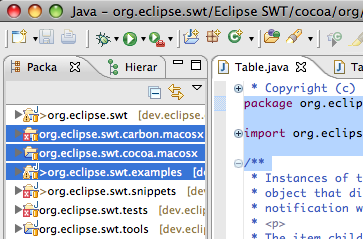
32 and 64-bit OSX Cocoa have joined the line-up of supported configurations for which SWT and Eclipse are routinely built. Cocoa is now a first class Eclipse configuration, including advanced libraries such as OpenGL for SWT. Cocoa replaces Carbon as the primary toolkit for Eclipse and SWT on Mac.
Solaris x86 has joined the line-up of supported configurations for which SWT and Eclipse are routinely built.
It's time to dust off that old mainframe in your basement, because Eclipse has arrived on the s390 and s390x architectures. This new port is still early access, so give it a spin and report any problems you encounter in bugzilla.
이제 GTK에서 Eclipse 를 위한 기본 버튼 순서를 변경할 수 있습니다. To have the OK 버튼을 왼쪽에 위치시키려면 ~/.gtkrc-2.0 파일에 "gtk-alternative-button-order=1" 을 추가하면 됩니다..
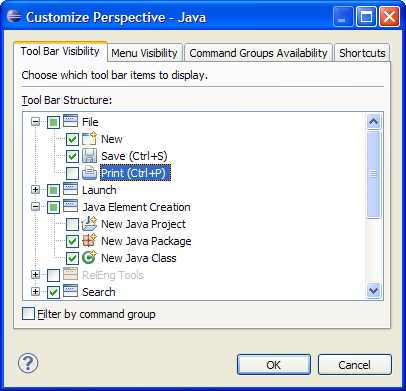
customize perspective 다이얼로그의 기능이 향상되고 새로운 기능이 추가되었습니다. 이제 메뉴와 툴바의 아이템을 숨기거나 노출할 수 있습니다.
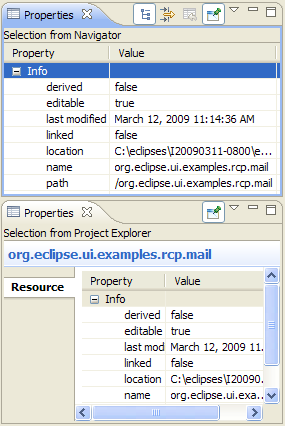
You can now create new instances of the Properties view from an existing one. The existing one will be pinned to the contents it is currently displaying and the new view will be set to follow the workbench's selection.
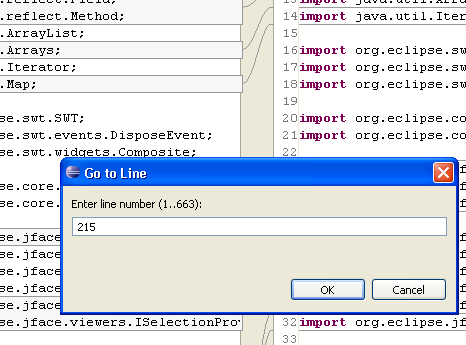
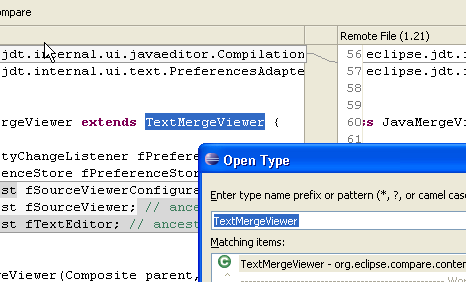
Compare Editor 에 새로운 이 추가되었습니다:
- 빠른 탐색을 위해 Go to Line 동작을 context menu 에 추가했습니다.
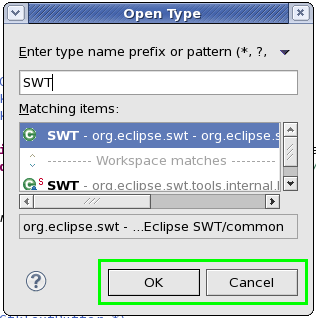
- 현재 선택된 텍스트는 Open Type 다이얼로그와 Open Resource 다이얼로그에서 검색어로 사용될 수 있습니다.
- 이제 현재의 행은 두 뷰어에서 강조됩니다.
- Background and foreground color preferences are now honored
- context menu 에 Set Encoding... 동작이 추가되었습니다. 이 동작은 비교하고 있는 양 쪽의 인코딩을 변경시킵니다.(This allows you to change the encoding of each side of the comparison)
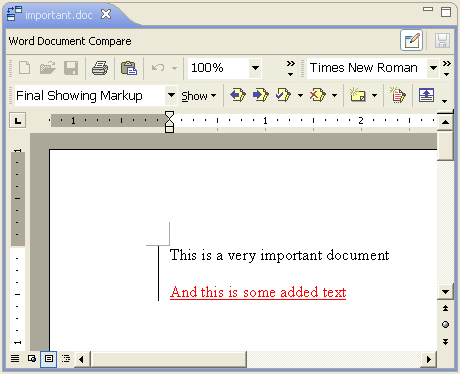
Comparing Word document changes in Eclipse now uses the Word compare support to show you the changes as revisions.
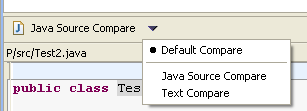
The Compare Editor allows you to switch to optional merge viewers available for the compared content. For instance, while comparing two Java files, you can use the simple Text Compare viewer instead of the default Java Source Compare.
You can also switch between content-specific merge viewers; for example when an alternative Java compare viewer is available, you can use it instead of the default one.
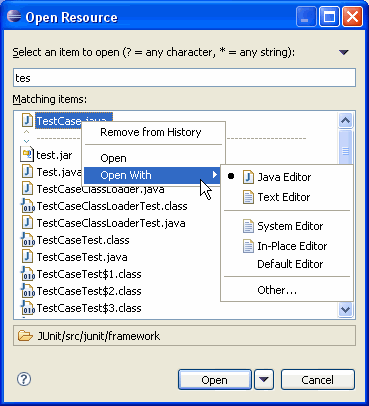
The Open Resource dialog now allows you to open files with the editor of your choice. You can either choose the editor from the Open With context menu or use the drop-down menu besides the Open button.
Switching between open editors and multiple editor pages has been streamlined. Ctrl+PageDown and Ctrl+PageUp now always activate the next or previous editor tab, even in multi-page editors. To switch between pages of a multi-page editor, use Alt+PageDown and Alt+PageUp.
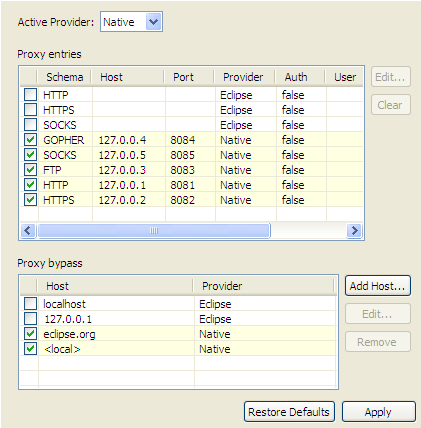
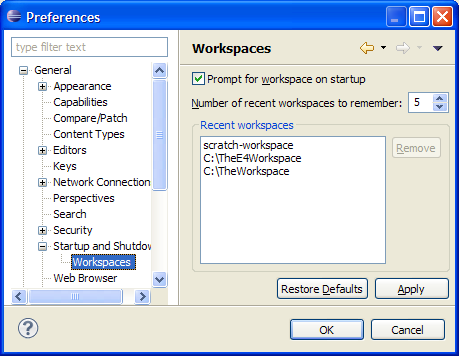
The Network Connection page has been changed to better show the current proxy configuration. Now if you go to Preferences > General > Network Connections, you are able to see and change Eclipse proxy settings as well as see settings provided by the operating system. If you want to use your browser or Gnome settings, or you have your proxy configured using environmental variables on Linux, you can see them all in this new UI.


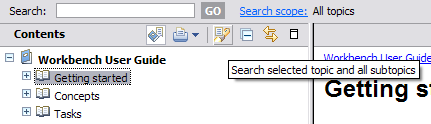
A search of the help system can be initiated with a scope limited to the selected book or topic.
New menu items have been added to the Help 메뉴에 새로운 아이템이 추가되어, 가장 일반적인 소프트웨어 관리 태스트를 즉시 호출할 수 있게 되었습니다. 이제 single update 다이얼로그를 열거나 action 버튼으로 페이지를 탐색하는 대신, Help 메뉴에서 일반적인 태스크를 즉시 실행할 수 있습니다.

예를 들어, Help > Check for Updates 를 사용하여 한 번에 소프트웨어 업데이트를 확인할 수 있습니다. 이 메뉴 명령어는 업데이트를 체크하고, 업데이트가 가능하면 소프트웨어 업데이트 마법사를 시작할 것입니다.
Available Software 페이지가 설치 마법사에 병합되어, Help > Install New Software... 를 사용하여 접근할 수 있습니다. 사이트, 카테고리, 이름에 따라 검색하거나 보는 탐색 기능이 전에는 Available Software 페이지에 있었지만, 지금은 마법사의 첫 번째 페이지에 있습니다.

가장 일반적인 워크플로우의 일부와 사용성에 대한 불평도 제기되었습니다:
- 이제 마법사는 업데이트 사이트의 연결을 기다리지 않고 즉시 시작합니다. 그래서 일단 마법사가 열리면 응답성을 더욱 증가시킵니다(This makes the view itself much more responsive once the wizard is opened.)
- 선택한 아이템에 대해 더 많은 정보를 보여주기 위해 페이지에 설명(description field)이 추가되었습니다.
- 이제는 변경할 때마다 설치 결과를 계산하지 않기 때문에 한 번에 여러 가지 선택 사항을 변경할 수 있습니다. 설치할 아이템을 선택하면, Once you've selected the items to install, the Next 버튼을 통해 검토 페이지로 갈 수 있습니다.button will take you to the review page. If there is an error or you otherwise want to change your selections, you can now go back and change the selections in the first page, and the resulting changes won't be computed until you move forward again.
The install wizard has been reorganized to make it simpler to add a new site and install software from it. You can add a new site by typing, pasting, or dragging a URL link into the Work with combo box. You can also use the Add... button to add a site. Auto-completion on names and locations is supported when typing in the Work with field, including completion of repositories that are currently disabled.
Only the content for a newly added site will be shown, making it simpler to find what you want to install. You can also use the combo to change the filtering of the available software by any site. The wizard has also been streamlined by placing the links to other views closer to the relevant information in the wizard.

A new checkbox at the bottom of the page lets you control whether all sites will be used when searching for the new software's requirements, or whether only the site selected will be consulted. Previously, all sites were always used when gathering the requirements.
The wizards for installing, updating, and uninstalling software now provide more detailed information about the software required to complete an operation. For example, when you install a feature, you will see a list of the other features required that will also be installed.

The update wizard has also been reorganized so that you can change your update selections in a separate selection page. When available updates are shown, the wizard will open directly on the details page.

From this page, use the wizard < Back button to see all of the possible update proposals and change the selections.

The Installed Software and Installation History pages have been moved into the new Installation Details dialog. To access these pages, choose Help>About and press the Installation Details button. In addition, you can now expand the top level items in the Installed Software page to see what software each item requires. From the Installation History page you can browse previous install configurations, and Revert to previous configurations.

This preference page also allows you to define your own name for available software sites. Names can be defined when adding a new site, or edited from the available sites preference page. If you don't provide a name, the name defined by the site itself will be used.

These changes apply to all textual editors in the SDK.
Textual editors now support block (aka column or rectangular) selection mode:
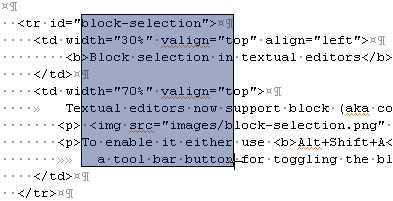
To enable it either use Alt+Shift+A or activate the 'Editor Presentation' action set to get a tool bar button for toggling the block selection mode.
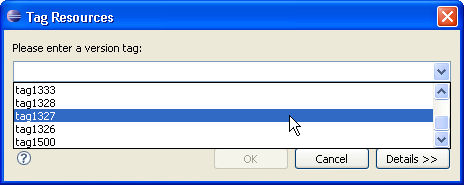
When tagging a project you can now choose a previously used tag.
Debug view now offers a breadcrumb which shows the current active debug context. The breadcrumb is activated automatically when the Debug view is resized to show only one line of text.

Each element in the breadcrumb can be selected and actions can be invoked through a context menu or keyboard short cuts.

Finally, a drop-down menu allows navigating to a new element and changing the active debug context.
